Showing posts with label craft. Show all posts

Friday, February 20, 2015

Salt Dough Crafts

I wanted to do something for my parents and in-laws for the Valentine's Day/Family Day weekend, as well as for us.
I've seen lots of craft ideas using a child's hand and footprints and figured I would do something similar. 
Originally I wanted to shape her footprints into a heart but have you ever tried this with a kid who can't bear weight on their legs?
I also tried to do her handprints but that is just as difficult as she would make a fist every time I tried to press her hand into the dough.
Even when asleep.

Maybe if I had rolled out the dough thinner...?

Anyway, I got enough of an imprint to paint it which helped it stand out.

If you're feeling brave, give this craft a whirl. 


  • In a bowl, mix together 1 cup flour with 1/2 cup salt. 
  • Add in 1/2 cup water slowly as you may not need all of it. Mix together, careful not to let the dough become too sticky.
  • Knead the dough then roll out on a lightly floured surface and cut out desired shapes.
  • Struggle to get your child's hand or footprint on the dough.
  • Allow dough to dry overnight, then bake at 170 degrees for 2-3 hours until completely dry. 

And let me know if you try this with an infant and have a foolproof method.

Thursday, February 13, 2014

Valentine's Day: 2 Cute Last Minute Ideas

Chalk it up to working nights last weekend but I found some more cute DIY Valentine's Day ideas that I want to share.
You've got one more day to get your valentine's in order!

Here are some last minute DIY ideas.

The first is Date Arrows from Sugar & Cloth.

DIY date night valentine arrows

Using some simple (and easy to get a hold of) supplies, you can become your very own cupid.
Come up with some fun ideas for dates for your valentine.
This works in many ways too, because if your valentine is getting on your nerves you can shoot these at them.
But they can't be mad because you're doing it with love.
Go here to see the whole post


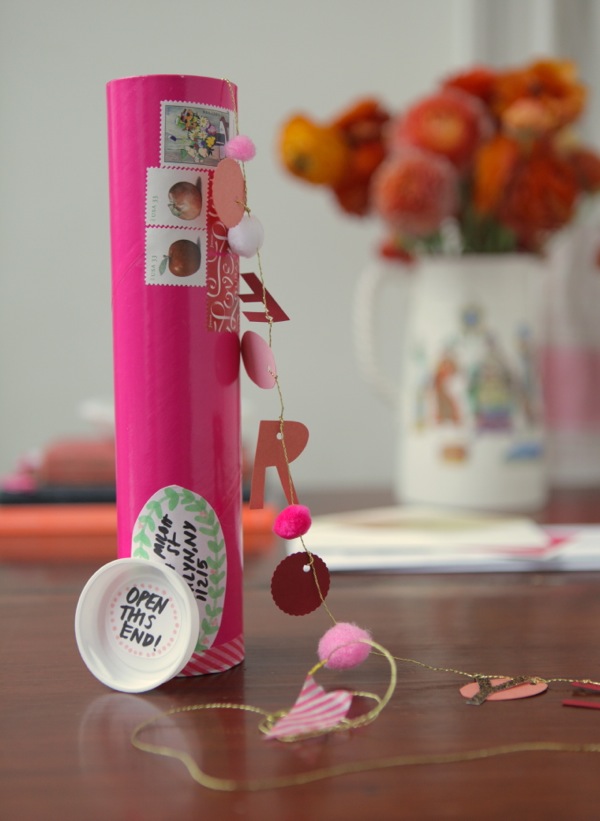
The second is a Valentine's Garland Mailer from Oh Happy Day


This one you might need to hand deliver though, or express mail it if you want it to reach your intended in time.
You can see the whole post with instructions here

I'm going on a Valentine's Day dinner tonight with the hubs to a new pizaa & wine bar that just opened around the corner from us.
Expect a review later!

Happy Valentine's Day


Tuesday, February 4, 2014

Valentine's Day Round-Up

Valentine's Day is one of those polarizing holidays that people either love or detest.
Personally I love it. But I love any reason to celebrate.
While I understand (and support) the "you should treat every day like Valentine's day" argument, you better actually be doing romantic things on the reg to back up your argument.

But since I love to celebrate, I've rounded up 5 of my current favourite Valentine DIY ideas.

Let me know if you have some good ideas of your own!


1. Black, White & Glittered Valentine's Day card


The card is simple and elegant. I'd follow the Style Me Pretty lead and glitter my hearts in gold either by gluing then glittering them or by tracing them with glitter pens.
Then be sure to print out the envelope liner below to jazz up the way you present your card.

(The link for the card is here)


(You can open the link for the envelope liner here)

2. Rose Body Scrub


If you're looking for a DIY Valentine's Day gift I recommend this rose body scrub from Oh So Pretty.
You can follow the step by step instructions on the website here. Just go out and grab yourself some coarse & fine sea salt, rose essential oil & jojoba oil.

3. Less Mushy, More Silly


Because sometimes "There's no one else I'd rather lay in bed & look at my phone with" is way more accurate and heart felt than anything else.
The PDFs can be printed here


4. For the Book Lover


Valentine's Day DIY Book Jackets


This is such a cute idea.
Follow the DIY valentine's day dust jacket tutorial over at Juniper Books here.

5. Talk Cake to Me
 Valentine's Day recipes: Easy to make (and so yummy!) Valentine's Day Candy Cake


The idea comes from All You and can be found here
I love the different use for he conversation hearts and might make a few individual cakes like this.  


What are your thoughts on Valentine's  Day?


Friday, January 24, 2014

Card Making 101

About a week ago I got together with 2 of my friends for a craft night, complete with pizza & wine.
Note: for those of you who are gluten intolerant, as both of these friends are, Magic Oven makes a mean gluten free pizza. It's pricey but the crunchiness of the dough is kind of a nice difference from the usually softer dough.

Anyway, after spending a good deal of time at Michael's perusing the aisles for craft supplies, we decided we would make cards and we picked up our necessities.

We bought card stock cards that were pre-perforated for folding in half, stencils, fancier print card stock, a bunch of stick on letters in various fonts, and ribbon and stickers for different occasions.

Even if you go in without a real idea of what you want to make, you can pick up what you need to make some really great cards.

I made 6: 2 Wedding cards, including my favourite which I'll show you below, 2 cards for expectant parents, a thank you card, and a valentine's day card for John (with one in the works for my mom).


My favourite is this one, for my cousin who is getting married in April.
I borrowed heavy inspiration from similar cards that I've seen.
All you need is some ribbon and to cut triangles out of other card stock you have.


It's cheaper in the long run AND way more fun to make your own cards.
I'm giving my sister, who has been the champion of homemade cards for years now, a run for her money.

Friday, January 17, 2014

Easy (but somewhat impractical) No-Sew Pillow Covers

This week, during my time off, I attempted to undertake some projects.

One of which was some no-sew pillow covers that I'd seen on (where else?) Pinterest.
I bought fabric at Ikea several months ago but never did anything with it.
After digging it out of our storage bench I decided to use it to spruce up some of our pillows to match them to other map styled pillows we had purchased awhile back.


Step 1: Cut the fabric so you have enough to cover the pillow when folded and enough fabric on the sides to tie the ends together.

Step 2: Place the pillow in the centre and fold the fabric over the pillow.


Step 3: Have your dog/cat/child/other household pest help.
Start step 2 over again.


Step 4: Fold the long ends in as if you were wrapping a gift.


Step 5: Tie the ends together, tucking the loose ends under to create a clean knot.


That's it!
I've seen recommendations to add a few stitches here to keep the knot from coming undone and I'd recommend that also. This no-sew idea is good for decorative pillows but not for pillows you plan to actually use (we use almost all of the pillows in our apartment. We're very cuddle-focused). 
So my next plan is to borrow my mom's sewing machine, learn to use it properly, and sew a whole slew of new pillow covers.
I went back to Ikea and grabbed more fabric for this future project.


Wednesday, January 1, 2014

Adventures in Knitting: Knittens (to warm hands on cold days)

During my experimentation with knitting patterns more complicated than blankets and scarves, I moved on to mittens. 
My first attempt ended in a gigantic mitten better suited for an oven mitt. 
So I started again, with a better idea of how to proceed.
The end result was still a bit bigger than I perhaps would have liked but I used it to my advantage and created felt inserts filled with rice that can be microwaved to provide some extra heat. 

Follow the pattern from Martha Stewart that I posted in an earlier post (also found here) or do what I did and use thicker wool and thicker needles and just cast on half the number of stitches they call for and continue with halving the numbers (except for number of rows, then just go by how wide the mitten looks).

I've taken to calling this knit mittens 'knittens'.


Once your knitten has been cast off, use a darning needles to stitch the mitten together around the edges.
I used a white wool to show what I did, but I removed it after and re-stitched it with the same colour wool to make it look cleaner.


For the microwavable insert, I traced the finished knitten onto a red felt stocking I bought from the dollar store. I ended up having to cut it a little smaller to fit into the mitten. I sewed around the edges, leaving a small opening into which I poured uncooked rice. Add just enough to fill the mitten without leaving it bulging. 


Ideally, use thread the same colour as the felt. Unfortunately in my case my dog took off with the red thread in her mouth and it was too slobbery to use on something I hoped would turn out nice.


I thought about sewing the inserts into the knittens but ultimately figured leaving them as inserts was the better option because they did make the knittens quite bulky.

I gave these knittens to my father-in-law, who works outside and I'm sure with all the crazy weather lately could use something to keep his hands warm. 

They make a cute gift AND I was able to knit both mittens in less than 5 hours so this is a project that won't take a long time to finish.

Here's to a 2014 filled with many more handmade crafts!
(Hopes & Dreams item #9!)


Saturday, December 14, 2013

Wreath Making

On Wednesday night we had some friends over for eggnog, wine & cheese, to watch Christmas Vacation, and to make Christmas wreaths. 

John got our supplies in the forest so they were fresh and (more importantly) free.


We took beautiful red dogwood branches and gently bent them into circles, tying areas together with twine to keep them together. Then we covered them with cedar boughs and pine cones. 


Dogwood branches are flexible and the small twigs can be wrapped around the bigger areas to make the wreath look cleaner. Having some of the twigs poking out makes the wreath look more rustic so we didn't bother worrying about tucking all of the twigs in.


To keep the branches together and to help the wreath hold it's shape, we tied pieces of twine around the wood at certain points. 
After securing our base together we stuck cedar branches in between the twigs.
They stayed put, there was no need to secure them in with twine.


Then to spice it up a bit we added pine cones to our wreaths. 
We tied fishing line around the bottom of the pine cones then tied the pine cones to the wreath. 
We hung ours on our door immediately.


You could add berries, ornaments, anything you wanted for a splash of colour. We may add more to our wreath but for now it smells and looks wonderful. 

Thursday, December 12, 2013

Knitting Projects

I recently (finally) finished a long knitting project:
This blanket.


I've made a blanket before but this was almost double the size of the first one and took me the better part of 6 months to finish. This was mostly because I'd start and stop and wasn't just consistently working on it. 

I finished it at work one night and then decided to get adventurous and try my hand at something more complicated than a straight garter stitch pattern.
In the same MSL issue with the bacon jam recipe, I also saw a knitting template for adorable mittens.
Following that template, I started on my first mitten.

I was using my big blanket needles so... I probably should have waited and used smaller needles or cast on less stitches than the pattern called for. 


It's the size of an oven mitt.
 I think once it's complete I'll use it as the dog's stocking. 

It was good practice to learn how to add stitches by "make 1 left" and drop stitches by knitting two together.

I will be trying this again with more appropriate needles.

If you're looking for a quick knitting project follow the template for these cute mittens here


Wednesday, December 4, 2013

Easy Holiday Ornaments

As I patiently (kind of) wait for this weekend to hurry up and get here so we can get our tree and finish Christmas decorating the apartment, I've been keeping myself occupied with other holiday things.
I've made cookies, I've started putting up decorations, and I've been wrapping presents.
 
Inspired by my friend Emily (who invited me to do a nursing/first aid talk with her Brownie troupe last Wednesday which was SO much fun) who does a handmade ornament swap, I thought I'd try and make some of my own.
 
After a Pinterest browse I came across a cute idea using scrabble tiles.
My best friend's husband calls me Scrabble (long story involving me trying to use code to talk about him with my friend wen they first started dating) so I though this craft was particularly appropriate.
 
I googled where I could buy extra scrabble tiles but ultimately ended up buying a bag off of Ebay.
 
I'm sure many stores that sell games also sell additional tiles. You can also purchase them on Etsy (as well as purchasing only the tiles you need).
 
All you need for this craft is scrabble tiles, something to make the ornament hang on the tree like a hook or ribbon, and a glue gun.
 
 
I spent more time than I'd like to admit trying to arrange words and sentences into scrabble patterns (Silent Night worked pretty well with the night coming off of the N in silent) and racked my brain for holiday phrases.
 
On the docket for today: making bacon jam.
Yep.
Apparently it's a real thing.
And it sounds gloooooorious.
 

Friday, November 22, 2013

Holiday Prep: Glass Etching & Pinecones

This morning John took the pup with him to work which meant I got to sleep in and spend the day out running errands without a care as to needing to walk the dog.
I imagine this is what having kids is like only slightly less tiring.
 
Once I got up I headed out to Michael's to buy some craft supplies.
I went with the intention of buying paints to give some edge to the pinecones I had collected at the park.
I've abandoned the squash/gourd centerpiece on our too infrequently used dinner table and am moving to something more holiday/winter appropriate.
 
Obviously I never buy only what I went to get.
I walked out with supplies to etch glass, circular knitting kneedles, more yarn, wrapping paper and baker's twine.
 
I immediately got to work on the glass etching.


I bought:
  • Martha Stewart Crafts® Etch Cream, and
  • Martha Stewart Crafts® Adhesive Stencil
Working with gloves and in a well ventilated area, arrange the stencils as desired then paint the cream in a thick layer over top. Allow it to dry for 15 mins then wash off with water and remove the stencils.
Voila!

 
You may not be able to see it too well but it's our name with a decorative little flourish at the bottom.
I'm going to try and do some more glass etching projects.
 
While I was waiting for the cream to dry I went to my craft box and pulled out mod podge and some glitter. After applying a coat of the glue onto the edges of the pinecone I dusted it with red glitter then allowed it to dry before shaking off the excess.  

 
I plan to gather a few more pinecones tomorrow and glitter coat a few more, one gold and maybe one silver.
 
Tomorrow (once I get home from work in the a.m. and take el poocho for a walk around the block - humming aloud to my christmas jams, natch) I plan on putting on my PJs with hot chocolate and curling up in bed with a christmas movie. After a short nap (I don't want to sleep too long in case I can't fall asleep tomorrow night) I plan on starting my christmas baking!
 
On the docket: Molasses spice cookies turned into thumbprints with the spicy balsamic grape jam that John made and/or apricot biscotti.
 
That post to come!
 

Tuesday, November 19, 2013

Christmas Craft: Advent Jar

As most of you are aware, Pinterest is the greatest thing ever to happen to the internet.
Need fashion or hair inspiration? Pinterest.
Need an inspirational quote or funny picture to get you through the day? Pinterest.
Need a craft idea? Pinterest.
 
When I work nights and it's quiet, the wee hours of the morning are often spent scrolling through hundreds of pictures on Pinterest.
 
On my recent Christmas kick I came across this cute idea and have decided to make one for John.
 
 
I'm planning to attach numbers to chocolates and candies in the jar.
Every 5 days (December 5th, 10th, 15th, 20th, and obviously the 25th) there will be a little present instead of chocolate. I've already picked up a bag of Lindt chocolates and a Tim Horton's gift card. I'm thinking some of the other presents can be things like new boxers and other items under $15.
 
I found a template for the numbers here (I might trim off the 'more days' part)
 
I'll keep you up to speed on how the jar goes.
I also fell in love with these DIY advent ideas:
 
Muffin Tin Advent Calendar
 
 
All you need is adhesive magnet sheets to cut to cover the holes. Plus candy to put in each spot.
 
Advent Calendar Wall Chart
(from thepaintedhive.net)

 
Full instructions plus free templates for this idea can be found at The Painted Hive website here!


Saturday, August 24, 2013

Anniversary Card

I saw the idea for this card on (guess where?) Pinterest and knew it would be perfect for John.
I meant to fancy it up a bit more and make it look more fishing vest-like but I forgot...
And spent my time working on the gifts that go with the card.
 
As I mentioned it's a fishing vest. With 4 pockets. And in each of those pockets is a fish on a tongue depressor (thanks, place of employment).
 
 
 And on each of those fish is a way to show someone you love them (as mentioned in a previous post).
"Acts of Service" I will post tomorrow because I meant to do it today but forgot. By forgot I mean I got home from work, popped 2 Zzzquils and slept for 7 glorious hours before heading off to work again.
For "Receiving Gifts" I bought him a documentary about Maynard James Keenan (of Tool/A Perfect Cirlce/Puscifer fame)  and his foray into wine making.
I cheated a bit and used "Quality Time" and "Physical Touch" together for one gift. A couple's massage! Sunday morning we can look forward to a relaxing rub down. This gift is also for me because I did something to my lower back ... probably from lifting and repositioning heavy patients.
Also I realize I'm giving him the gift of physical touch from someone other than his wife but let's be honest, my massages are mediocre at best.
 
 
"But that's only 4 fish. What about Words of Affirmation? You forgot one."
No I didn't.
They're on the back!


I'm so excited for this weekend.
Strolling around Niagara, sampling wines and ultimately buying way more than we intend to, getting massaged, sitting in the heart shaped tub with a glass of wine, and spending time with my husband.
 
They say you're only newlyweds for the first year.
Maybe technically.
But that feeling's going to take a lot longer than a year to disappear.

 
Happy 1st year of marriage, (insert any number of silly pet names here)